Made by Jiawen Yin and Hao Tan
Introduction
My Inspiration
The initial idea was, in fact, very simple. At the time, I noticed the growing pile of large cardboard boxes at home — since we often receive packages from China, they just kept accumulating. Instead of throwing them away, I thought it would be much more meaningful to transform them into something creative, making full use of the material rather than letting it go to waste.
As I searched for references, a memory from childhood came back to me. I used to love building small airplane models out of cardboard; those moments of crafting were some of my happiest times. This time, I decided to scale up that memory and fulfill a childhood dream — to build a cardboard airplane big enough for me to sit inside.
Now, thanks to what I’ve learned in VFX, I finally have the ability to transform that childhood fantasy into a piece of moving image.

Story & Concept
Back in May, I unfortunately lost my hard drive, so this section of materials is currently missing. Once I recover the drive, I’ll add this part back into the blog, including the original storyboards, sketches, and a more complete outline of the narrative concept.
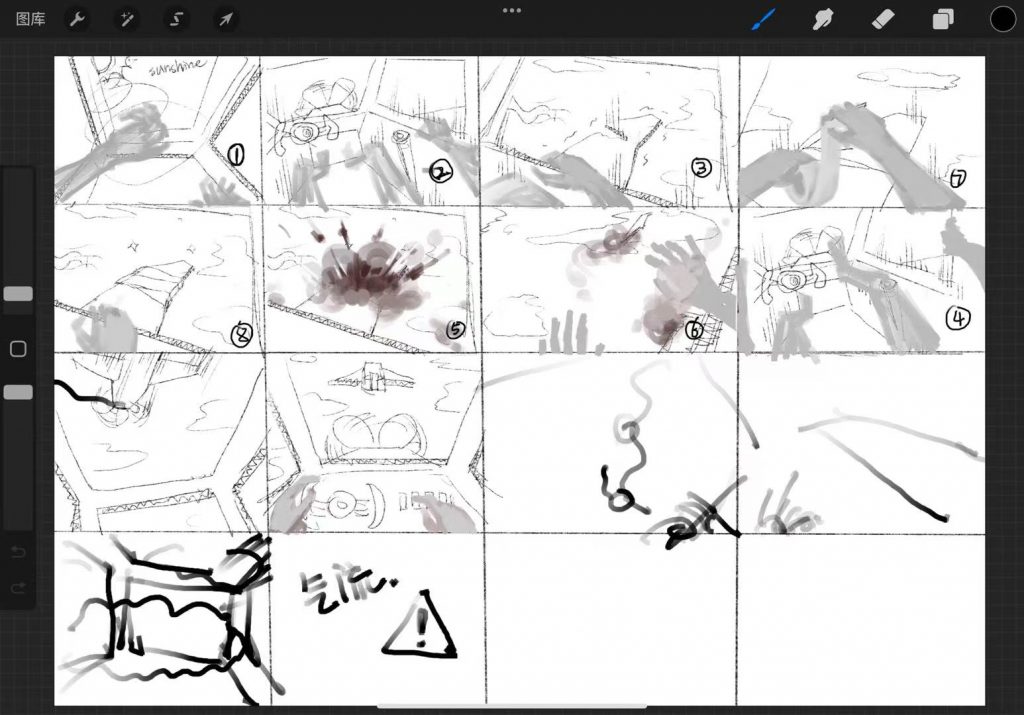
Only i have is this image made by Hao
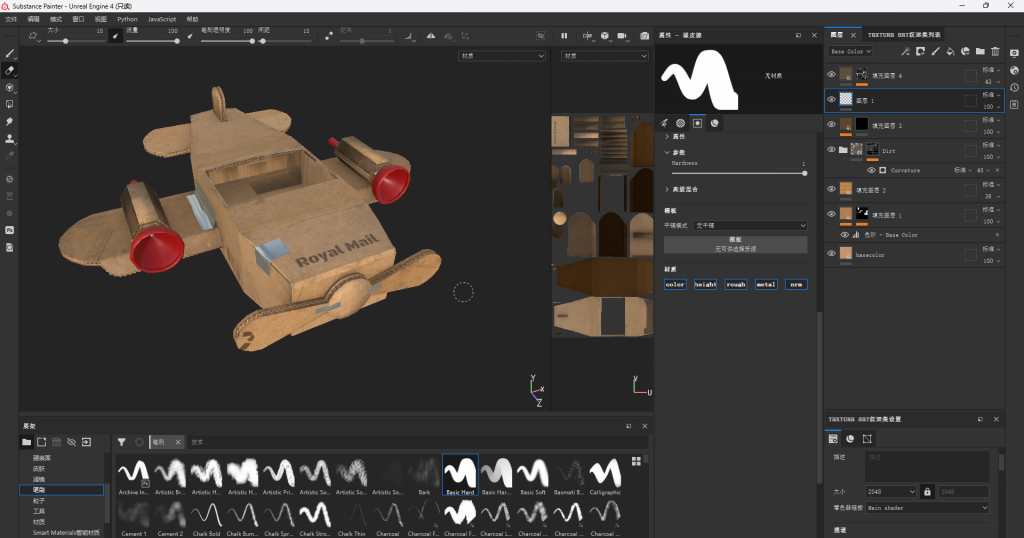
Making the Cardboard Airplane
Making the Cardboard Airplane
After evaluating the workload, I realized it would be almost impossible for me to handle everything alone — from prop building and filming to chroma keying, tracking, compositing, VFX, and rendering. So I decided to bring in a collaborator. Coincidentally, my friend Hao was struggling with his own personal project at the time, so I didn’t hesitate to invite him on board. We had already worked together several times before, which made the collaboration smooth and natural.
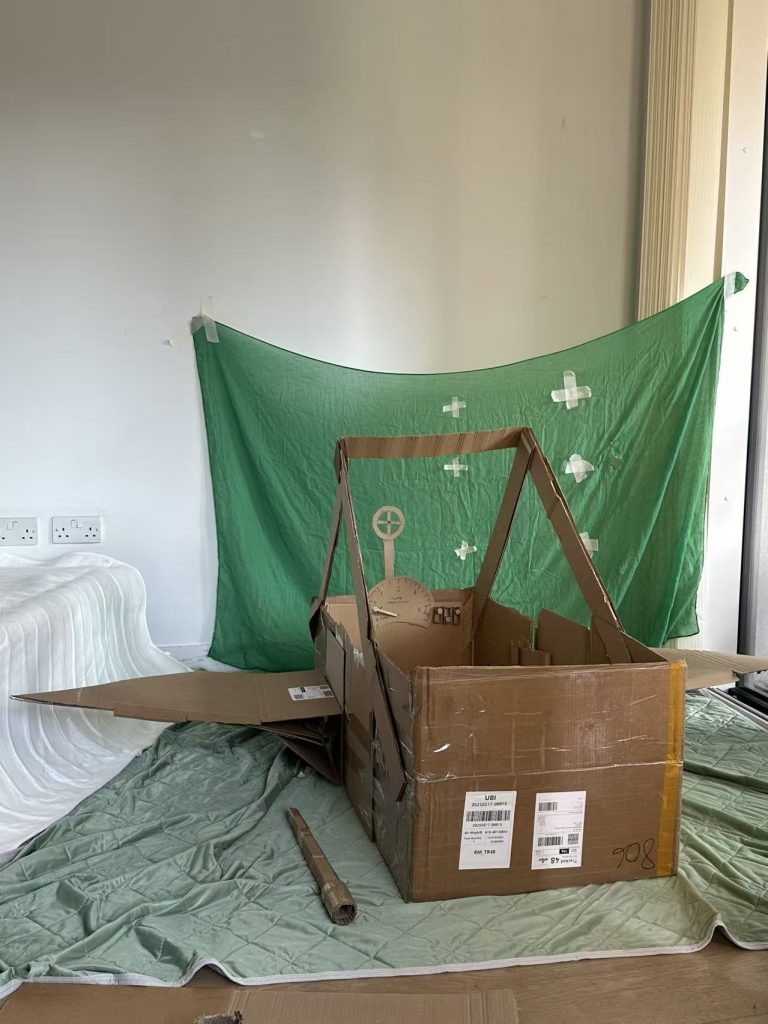
We went to Pondland to pick up some essential tools — scissors, rolls of tape, and a hot glue gun. That evening, we spent almost the entire night cutting, gluing, and assembling the cardboard boxes piled up at home. By the end, we had built a massive cardboard “airplane” — a clumsy but delightful toy that set the stage for the rest of the project. Special thanks to Peiyao, whose background in manufacturing engineering helped us reinforce the structure and make the airplane much sturdier and more reliable.
Filming
We first scouted the school’s green screen studio. The setup was impressive, but it lacked one crucial element — natural sunlight. We tried to recreate the effect with studio lights, but it just didn’t capture the atmosphere I had in mind. In the end, we bought a piece of green fabric from a materials store and decided to shoot on my apartment balcony instead. This solution not only gave us natural light but also saved us the trouble of moving the giant cardboard airplane back and forth.
Since my balcony faces west, we scheduled the shoot for around 5:30 p.m. At that time, the sunlight slants beautifully across the plane’s body, creating exactly the look I wanted — and all without spending extra on lighting equipment.
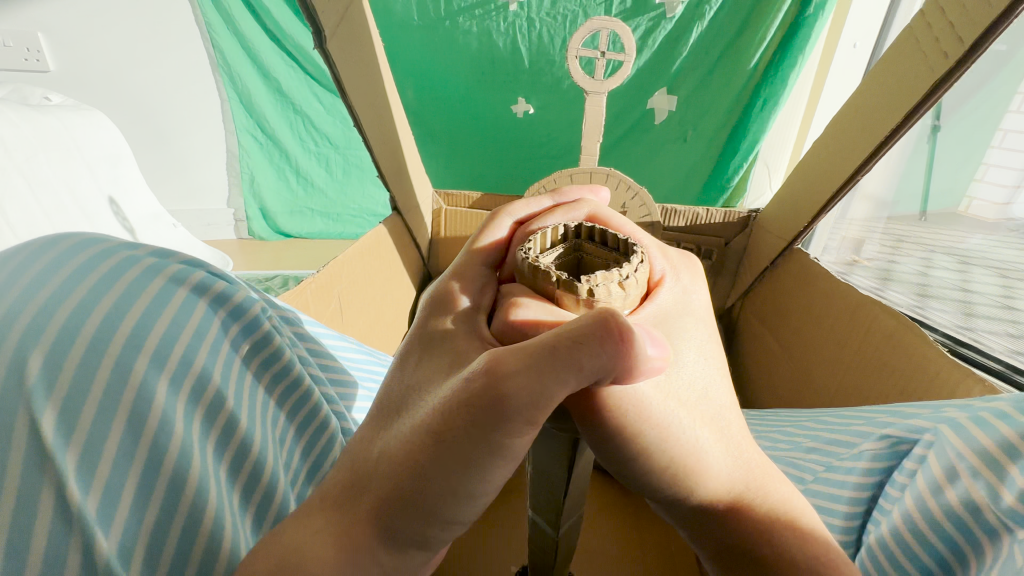
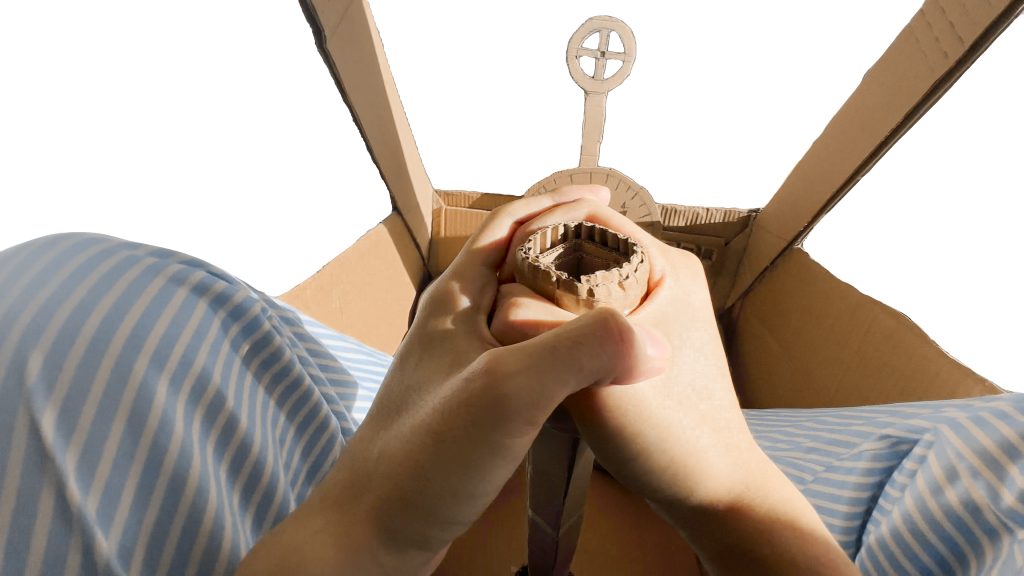
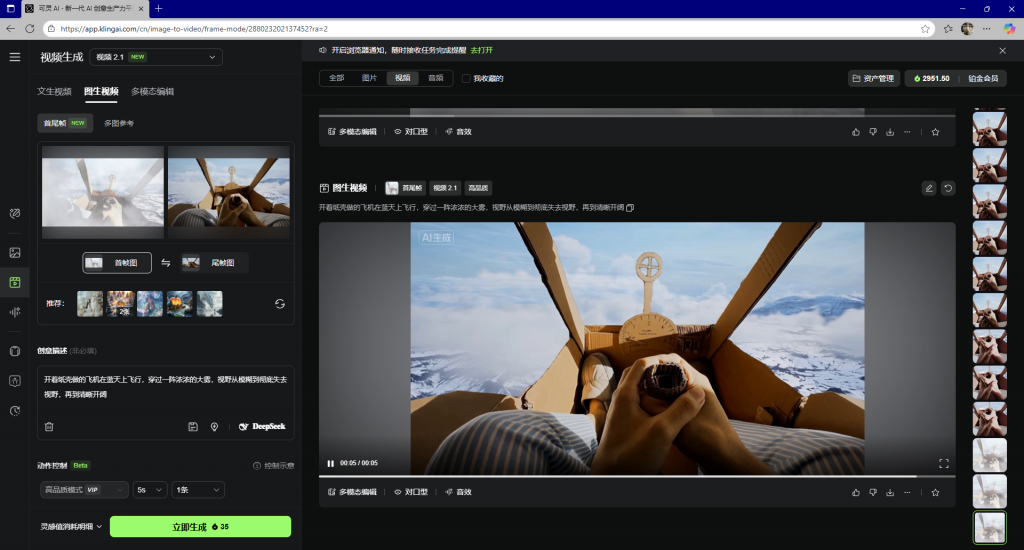
During the shoot, I finally climbed into the cockpit of the cardboard airplane and staged a “dogfight” against the enemy planes in my imagination. Hao served as the cinematographer, while Peiyao used my hairdryer to simulate gusts of wind. The setup may have been simple, but it was filled with creativity and fun.
For the camera, I chose to use my iPhone 14 Pro Max. I had tested my GoPro as well, but in this small-scale setup, the iPhone produced better results. In the end, the GoPro became a behind-the-scenes camera, documenting the entire process.
Chroma Keying & Rotoscoping
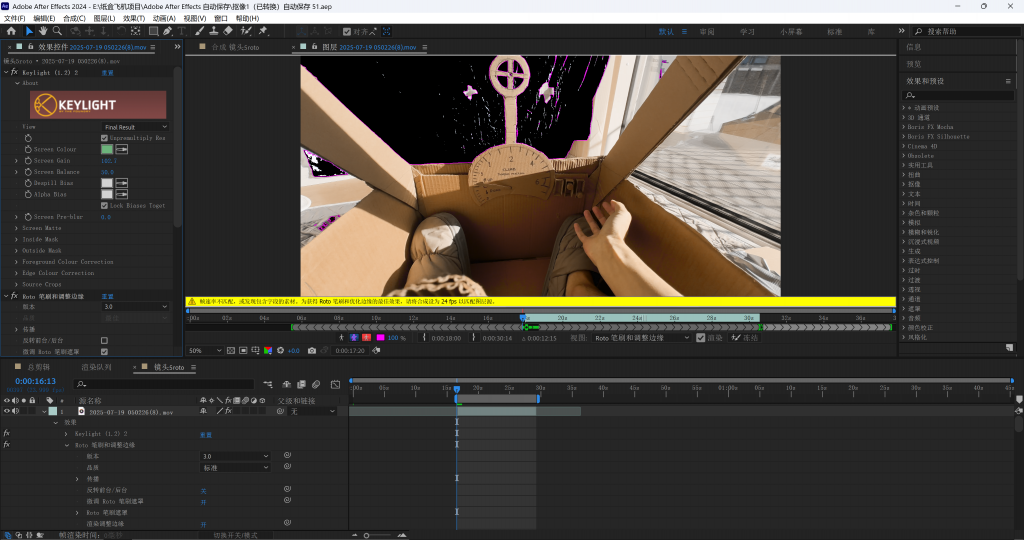
Before shooting, I had already anticipated that the crosshair on the airplane’s nose would be particularly challenging to key out. To deal with this, I used chroma keying (green screen removal) for the nose section, while the rest of the airplane was handled with traditional rotoscoping.
I experimented with both Nuke and After Effects. Nuke offered greater precision, but After Effects’ Roto Brush proved more intelligent and efficient. With AE, I could adjust roughly every 3–4 frames, while in Nuke the mask tended to drift after only 1–2 frames, requiring constant corrections.
In the end, I spent about a week completing the background removal for all the shots, using a combination of Keylight chroma keying and Roto Brush rotoscoping to achieve the final clean plates.
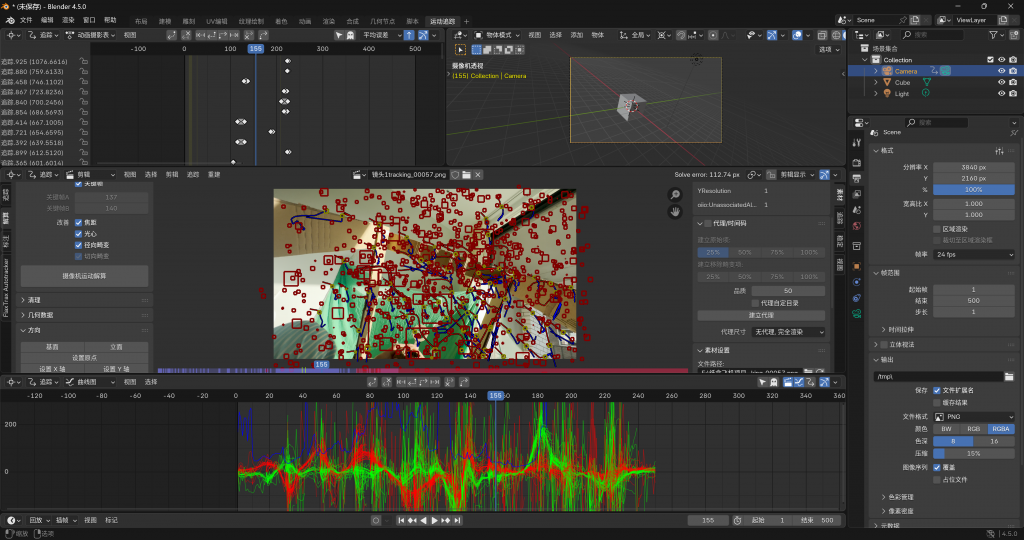
Tracking
For the tracking process, I tested a variety of software, including Blender, After Effects, Nuke, and Mocha Pro. However, because of the intense and chaotic motion in the footage, none of the automated solutions produced stable results. Both planar tracking and 3D camera solves frequently slipped and drifted.
In the end, I had to abandon shortcuts and rely on the oldest and most reliable tool of all — frame-by-frame manual tracking by hand. It was time-consuming, but it gave me a much deeper appreciation of the subtle details in the camera movement.
3D Props
The 3D props were primarily created by Hao. He was responsible for modeling the enemy airplanes in 3D, which were then composited into the shots to battle against my cardboard plane. While my main aircraft was physically built from cardboard, the opposing planes existed entirely in digital form. This approach saved us the effort of physically building multiple props and added greater depth and intensity to the dogfight sequences.
compositing
I carried out the compositing work inside Unreal Engine. I began by generating a basic terrain and setting up a skybox, then added a few layers of clouds to give the sky more depth. After that, I converted the live-action footage into a dynamic material and placed it onto a Media Plate, which I synchronized with the virtual camera’s movement. This allowed the filmed elements to align naturally with the digital environment.
During this process, I fine-tuned the camera settings — including focal length, aperture, and depth of field — to match the look of the original footage. Once these adjustments were made, the composite came together very close to what I had envisioned.


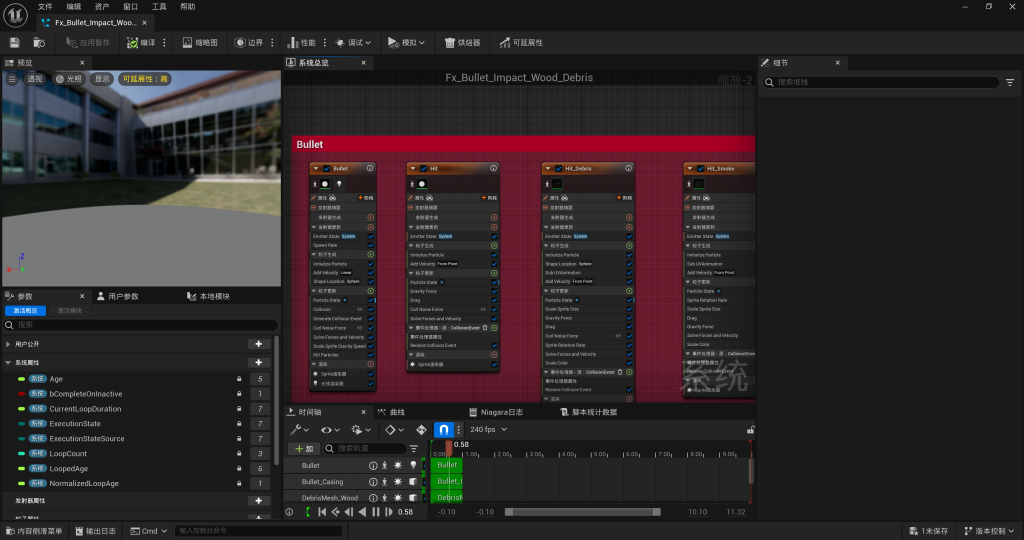
VFX
For the visual effects, I mainly focused on simulating the gunfire and explosions during the aerial battle. For the bullet effects, I followed this tutorial ((4) Easy Bullet Trails & Bullet Hits with Niagara In Unreal Engine – YouTube) and then adapted and expanded the techniques to fit my project. This allowed me to create sequences of dogfights, complete with flying bullet trails, impact hits, and subsequent explosions.
When combined with the live-action cardboard airplane and Hao’s 3D enemy planes, these effects added tension and a stronger sense of spectacle to the final film.
Editing, Voiceover & AI Integration
One of the biggest challenges in editing was achieving the illusion of a continuous long take, even though our footage was shot in segments. At first, we tried traditional techniques like crossfades and frame blending, but the results never looked convincing. In the end, it was Hao who applied AI tools to smooth out the subtle differences between shots, creating a seamless “one-take” effect. The technical details of this process are explained in more depth in Hao’s own blog.
The audio work — including the airplane’s engine roar, bullet trails, explosion sound effects, and even voiceover — was also primarily handled by Hao. His contribution tied the visuals and sound together, significantly enhancing the film’s overall sense of immersion.
Reflection
Through this project, I not only fulfilled a childhood dream but also gained a much deeper understanding of the full filmmaking pipeline. From prop building and filming to keying, tracking, compositing, and visual effects, each step revealed both the challenges and the joys of creating something from scratch.
Most importantly, the project highlighted the value of collaboration. Without Hao’s contribution, I could hardly have finished it on my own. His work on 3D modeling, AI-based editing, sound design, and voiceover elevated the film far beyond what I originally imagined. Likewise, Peiyao’s support in reinforcing the cardboard airplane made our shoot both possible and reliable.
Looking back, the greatest lesson I’ve learned is that creativity and resources always interact. Constraints often push us toward more inventive solutions, while collaboration expands the scope of what’s achievable. In future projects, I hope to continue exploring the mix of handcrafted and digital approaches, while further developing both my technical skills and teamwork experience.
Leave a Reply